This may be a repost of last year, but it’ll do. Plus, we’re no longer in that hotel room, so don’t panic!
Since I’m too lazy to look back and find my answer from last year’s prompt, you’ll get a fresh answer, though it won’t be a so called “favorite”… but it’ll still probably make you hungry.
Our room only comes with a microwave, countertop range (two spots to boil or fry something), a glass mixing bowl, one frying pan with a lid that belongs to a smaller pan, and a handful of kitchen utensils, and there’s no cooking going on in here, unless I want every single item we own to smell like our last meal. For everyone’s benefit, I’ll write about what I used to cook, instead.
There was my mother’s homemade chili, hamburger/cornbread casserole, or her lasagna… that lasagna was to die for!
During my children’s young years was the proving ground for my culinary skills, which were quite undervalued and appreciated, in my opinion. While they may offer mixed reviews, I feel quite accomplished in both cooking and baking. In truth, due to the creation of the Easy Bake Oven, my baking is probably the better of the two.
Meal wise, a sure fire winner would be my Brown Sugar Burgers. But only use the good buns, because the cheap kind always fall apart like wet paper! I think that I may have written about a Chicken, Mushroom, and Artichoke Fettuccini Alfredo, with fresh Sourdough Garlic Bread. Oh well, I won’t bore you with the details, but it was really good!
Dessert wise, I’ve been told that my Snickers Cheesecake was better than ‘you know what’, but my personal favorite desert would have to be in the cake department. It’s a homemade pound cake with French Vanilla Cream Cheese frosting, covered in fresh strawberries. The strawberries were sliced and covered in a sprinkling of sugar overnight. I always used the syrupy juice to drizzle across the top of the cake, right before it was sliced!
Hands down, cookies will always be my prize winner, but sometimes we have to remember the rest of all that yummy food. With that being said, I’ve done my part in offering a sincere answer to the prompt, but there are other things I wish to spend my time doing this morning, so I’m off for now…
You didn’t think I would forget the cookies, did you?
Though I’m somewhat at a disadvantage when it comes to baking, what with only using ingredients that won’t hurt my stomach, I refuse to let it stop me from doing what I love.
Fortunately for me (and Squagon), one of the few things my stomach agrees with, are nuts. Did you know that nuts are classified as a fruit? Who knew? Not all, but most nuts have been a life saver to me, as they’re a great source of protein, as well as, healthy fats. My two favorites are almonds and peanuts, though I’ll not be able to pass up a handful of cashews, here and there.
Back in my early baking days, I created a recipe for Chocolate Chip Peanut Butter Cookies that were to die for, so to speak. I’ve never given the recipe out, only because it made the cookies more valuable, lol.
Unfortunately, I currently have a severe aversion to anything chocolate. I miss baking cookies, and my husband’s been starved of his favorite treats, so where does it leave me?
This is where our Squagon comes in handy, as this little guy knows peanuts like no other! Between the two of us, we’ll soon come up with an all new secret cookie recipe… it’ll just be healthy, that’s all.
So far, I’ve found that Reese’s Pieces work for a good replacement for the chocolate morsels. I don’t want to attempt any chocolate alternatives, at least until I’ve mastered the rest of the ingredients. The cookies need to have the right consistency, first.
I will be attempting a re-write of my original cookie recipe, only replacing or removing what might offend my stomach. I’ve been able to bake with eggs, though only as a small ingredient, but that should be alright. I already know that the flour is the 1:1 gluten free flour from Red Mills. They say that you can simply swap it with the normal flour, without any problems. I tested this by baking those muffins, remember? It worked then, so I’m willing to trust it in this case.
What could be the problem, you ask? The liquids are the problem. Specifically, the milk and butter. The butter can be experimented with, what with finding one that browns the cookies to my liking. The milk, however, has had both successes and failures. I’m fairly certain that it has something to do with being too watery, or too creamy. My suspicions tell me that it has more to do with adjusting my dry ingredients, rather than changing up the Oat Milk, which is one that my stomach can tolerate.
If you have any suggestions, I would love to hear them, as it’s always good to troubleshoot a thing, when you have help. My goal is to have ingredients in hand next Saturday, along with a group effort sort of recipe, and I’ll post my step-by-step experiment, as I bake.
While I can make a pretty mean chili, salsa that can melt the paint off a house, homemade soup bowls to fill with dreams, and a good many other dishes I picked up along the way… baking is my passion!
Not just baking, but desserts mainly… and not just desserts… I LOVE COOKIIIIEEEESSSSS!
I am well versed in baking most types of cookies, but my most highly prized handheld delight would by my secret recipe of ………………..
Peanut Butter Chocolate Chip Cookies
These are not just anybody’s cookies, but my own twisted version. While I won’t tell you the exact recipe, I will say that it mostly has to do with HOW I bake them, more so than all my secret stuff I throw in before baking the dreamy mouthfuls.
Let me just say that I have perfected the art of perfect oven temperature, yummy ingredients, and a sore back from standing bent over in front of the oven, and watching for the perfect moment to pull em…
They come out golden brown and crispy on the surface, but when you break them open they are perfectly ooey gooey on the inside… A tall glass of milk is a must for these, as I forgot to mention that I make them about the size of an open hand, not a child’s hand, no no no, but a grown up people size hand…
They were Huge!
When my girls were small, we spent a great amount of time involved in church. Every spring the church would do bake sales to raise funds for our Children’s Ministries. I would make a triple batch of my cookies, wrap them individually in colored cellophane and ribbon, set up a spot on the church bake sale table, and watch the cookies disappear within less than a half hour. That’s a lot of cookies people, A LOT!
When I refused time and again to give up my recipe to some of the moms, I seriously worried for my safety a few times… lol… just kidding!
I did often jokingly say that my recipe was a Government Secret and if I told them the recipe, I would have to make them disappear… that always got some laughs.
So there you have it folks, hot off the press… we can bake cookies pretty good!
**The original cookies had mold all over them, so, as per my commitment to quality… These are fresh!
I’ve had sort of a rough week when it comes to food, so I want to give a disclaimer, here. **All testing and results may vary, as I’m not certain if my skills, my stomach, or my taster were behaving properly!**
My baking adventures started out seemingly normal. I gathered up all my ingredients, recipes, and cooking tools…
And, yes, you heard me correctly when I said recipes, plural, meaning more than one…
You see, I found this recipe for a delicious looking Pumpkin bread, but then also saw a recipe for Cream Cheese Frosting. Unfortunately, I can’t have dairy. So, I had this notion that maybe Tofu might work as a comparable substitute for the cream cheese.
There’s a huge number of frosting recipes available using Tofu as a substitute for the cheese, so the assumption was made that it should be a success… right!?
Wrong!!!! I’ve never smelled something this vile in all my days, aside from Salmon, Slime, or that Vietnamese fish sauce stuff. Now, I don’t know if it’s just me, what with my health issues, or if it was truly that rank! I didn’t have the heart, nor the stomach to ask my husband to sacrifice his taste buds… so I tossed it! It smelled like a combination of playdough and that Paper Mache glue we used in elementary school.
I went ahead with the Pumpkin bread idea, opting for a simple maple glaze of my own creation. I’ve shared the bread recipe I chose, below…
Classic Pumpkin Bread
Homemade Pumpkin Bread is a favorite Fall recipe that’s loaded with warming spices and packed with tons of pumpkin flavor. It will make your house smell so good that you’ll forget you just bought a pumpkin spice candle! This delicious pumpkin bread recipe is super moist and both gluten-free & dairy-free.
In a medium bowl, combine the flour, baking soda, salt, and spices.
Beat eggs and sugar in a large bowl or stand mixer on medium speed.
Add the pumpkin, then slowly add oil and water. Beating well after each addition.
Add the flour mixture and beat on low until well combined.
Pour the batter into prepared pans, dividing evenly.
Bake for 1 hour or until the center comes out clean with a toothpick.
Let the loaves cool in the pan for at least 10 minutes and then turn onto a rack to cool completely.
Did you know that those plastic Ice-cream tubs work great for mixing bowls? Use it if you got it… that’s what I say!
Anyway, I followed the recipe verbatim (exactly as was written), except that I used Olive Oil. Well, I did also switch out the two bread pans for a single 12 inch spring form. (Some of the best places to find specialty cookware is Goodwill, believe it or not!)
It did have to be baked for 80 minutes, in contrast to the 60 minutes for two bread tins that the recipe reflects…
Voila!
Now, I must confess that I used my husband as my taste tester this week… don’t blame me, blame the Tofu! You guys, I couldn’t get that smell out of my head, or out of the apartment for the entire day. It was awful!
To be fair to vegans around the globe, I think that I may have an aversion to Tofu, along with the Salmon that I mentioned earlier. Memory has a funny way of messing with you, sometimes. And, many people use Tofu in a number of ways, swearing by it! So, if you would, kindly go easy on the Tofu community. Let’s just call this one Operator Error, and move on.
All that I did here as a substitute for the frosting, was to make a simple drizzle with 1/8 cup Maple Syrup (any brand will do), 1 cup powdered sugar, and 2 tsp of lemon juice.
My husband gave it 2 thumbs up, and if he likes it gluten-free, you will too!
As for me, maybe it was the Tofu, or quite possibly the Barium sludge I had to swallow the day before, but I don’t know if pumpkin and I can ever be friends again, seriously!
Next week should be far better, as I’m going to tackle a gluten-free, dairy-free, cinnamon roll, or sweet buns, if you like. I’ve never worked with yeast in gluten-free baking, so it’ll be a bit of a learning curve.
Hey, if you’re game, I am! Why, a young King David slew Goliath, with not but a stone and sling, so I am confident that I can challenge a loaf of bread, with not but Bob’s Red Mill 1 to 1 flour!
Gluten-free bread baking, here I come. Wish me luck…
With the fall season rushing to fill our senses, and our kitchens, with warm and comforting October favorites.
My favorite flavor’s during October center around apples, caramels, and those delectable crumbly cobbler style muffins and cakes.
I decided to start with the apple’s, as they go so well with fall spices and syrupy drizzles, which are my weakness.
Personally, I believe that an apple can make or break the flavor combinations in certain styles of bakes. While many apples are plenty sweet, tart, and juicy when you eat them raw, things change when you bake with them. If the apple isn’t tart enough to stand up to all the sugary flavor, the apple flavor gets drowned out, if you know what I mean.
So began my mission toward successfully baking a gluten-free apple cake from scratch… no more store bought box mixes! It was time…
First, I needed to find a recipe that I could follow for a flavorful apple cake, and gluten-free. Honestly, I see amazing videos on Facebook all the time, which is where I watched a woman make these jaw-droppingly glorious Apple Crumble Muffins. The down side was that it wasn’t gluten-free, and also made with muffin tins, which I don’t have unless my girlfriend brings hers over when she comes for Sunday Coffee/Tea.
So, I headed back to Pinterest, which is God’s gift to all DIYer’s!
I realized that an apple cake or bread was the better choice for this recipe, as using a muffin recipe can have unpredictable results when converting it to a bake in a cake or bread tin. I decided on a cake recipe, as I want to save the bread one for a pumpkin dessert I’m attempting to bake for you, on a different episode.
While I was forced to make numerous adjustments, which I will share as we go, under no circumstances do I wish to take any credit away from those that came before.
Here’s the original recipe and link, as I’m certain that this recipe will be just as wonderful, if not better than mine. Be sure and check it out…
High Protein Apple Crumble Cake (Gluten-Free!)
Make this Gluten-Free Apple Crumble Cake and fall obsessed in minutes! This high-protein dessert is a dream come true for so many reasons; it’s decadent without being heavy, it’s gluten-free and easy to digest, it’s sweet but not going to spoil your sweet tooth and it’s just downright beautiful! It’s packed with warm spices and the addition of protein powder makes it a nutritious choice, perfect for enjoying any time of day and sure to become a seasonal favourite.
Preheat oven to 350d. Grease and line an 8”pan with parchment paper and set aside.
Add oil, sugar, eggs, milk and vanilla to a bowl and whisk to combine.
In a separate bowl add dry ingredients and whisk to combine. Add dry to wet, whisking till you reach a smooth batter. Add chopped apples and fold them in until combined.
Pour the batter into the prepared pan, smoothing it out with an offset spatula.
Make the crumble topping by adding dry ingredients to a medium sized bowl.
Pour melted butter on top and stir to combine. The crumble should hold together when squeezed.
Scatter the top of the cake evenly with the crumble topping.
Place in preheated oven and bake until a skewer comes out clean from the centre of the cake and the cake is golden brown, 45-50 minutes.
Let the loaf rest in the pan for 15 minutes before removing the springform ring. Carefully transfer the cake to a wire rack to cool completely.
While cake is cooling make the glaze. Add glaze ingredients to a small bowl and whisk to combine.
Once cake is cool drizzle the top with the glaze and enjoy!
**Disclaimers** My cooking skills, ingredients, and baking tools are all based on real world baking! Not everyone can afford most of the high end name brands, or the organic labeled ingredients that triple the price simply by saying the words Gluten-free, Dairy-free, and the like. I also don’t think that the craftsmanship of said measuring cups and spoons, pans, trays, and/or cooling racks need be a deal breaker. I once watched a video of a guy making an entire burger on a clothing iron, and I would have eaten it! Rule for today is… sometimes ghetto get’s the same result! It depends on how hungry you are for somethin sweet, I guess.
Now, back to the bake…
So, with recipe on board, I set about my task of mastering the Apple.
I chose SugarBee for our apples, though you may have your own personal favorites.
As you may have noticed, there was far more sugar sweetening in the recipe, than apples, in my opinion, so I did some changing in regards to that drizzly sugar syrup topping. I also didn’t have any safe protein powder to add, as many use wheat and I don’t have the one she recommends. If any of you do this recipe and use the protein powder, please let me know how it turns out. I may go back later and try doing it with said powder added, just to see.
What I decided to do was add an extra quarter cup of my gluten-free flour to offset the moisture. I also did a radical change to the crumble topping, so watch for it, as we go. Alright, let’s do this!
First things first… we need to prep. A clean baking environment, breeds success…
I absolutely do pray that God gives me success, when baking. I need all the help I can get!
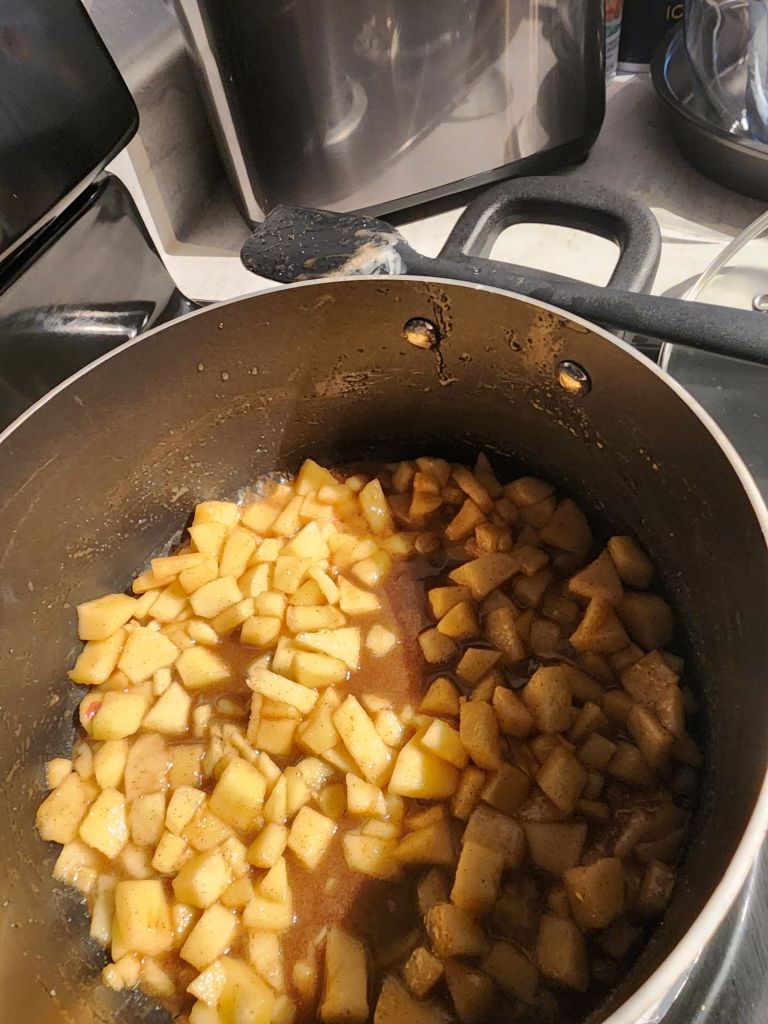
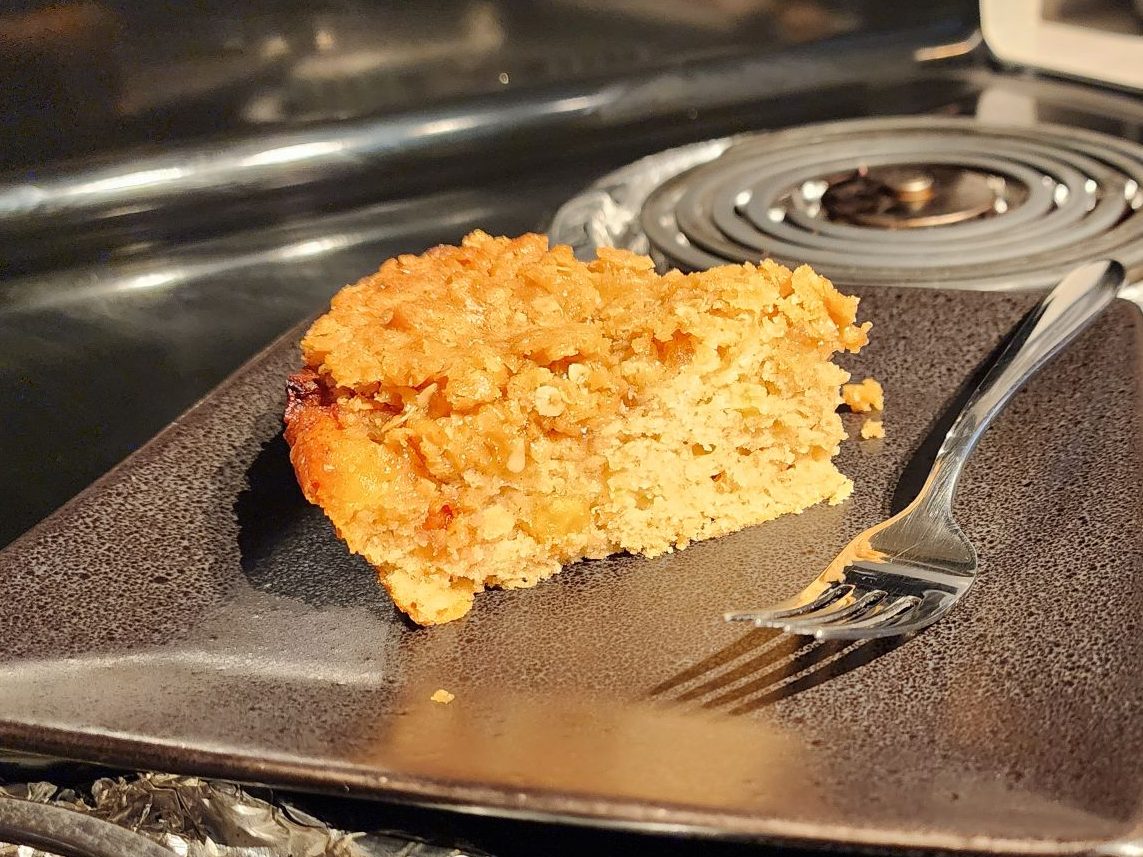
Apples peeled and diced. Half were set aside to be mixed into the cake…
The other half were turned into an apple compote, with quarter cup sugar, quarter cup brown sugar and quarter cup plant-based butter. I used Country Crock…
I didn’t make any other changes to the cake recipe, aside from the protein powder. I used Oat Milk in mine, but she says that you can use any plant based milk. I took the apples that were set aside, tossed them in some of the cake mixture, and then mixed them into the cake mix.
After lightly spraying my 9 inch cake pan with Olive Oil spray, I poured the cake mixture into my pan.
Here is where I went off the reservation… and a miracle happened!
I took all of the apple compote, liquid and all, and poured it on the top of my cake mixture. Looks reckless, doesn’t it? I didn’t stop there, though…
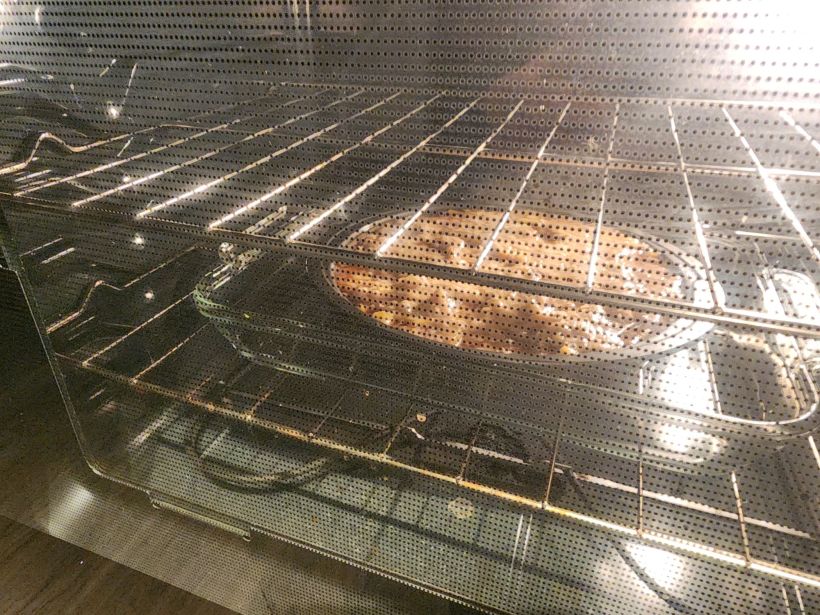
I filled that bad boy all the way to the rim of the pan with the crumble mixture, minus the pecans (I didn’t have any) from the recipe above. I was so worried that it would overflow before the sugar had a chance to caramelize and soak into the crumble mixture that I put a dish under it to catch the spills.
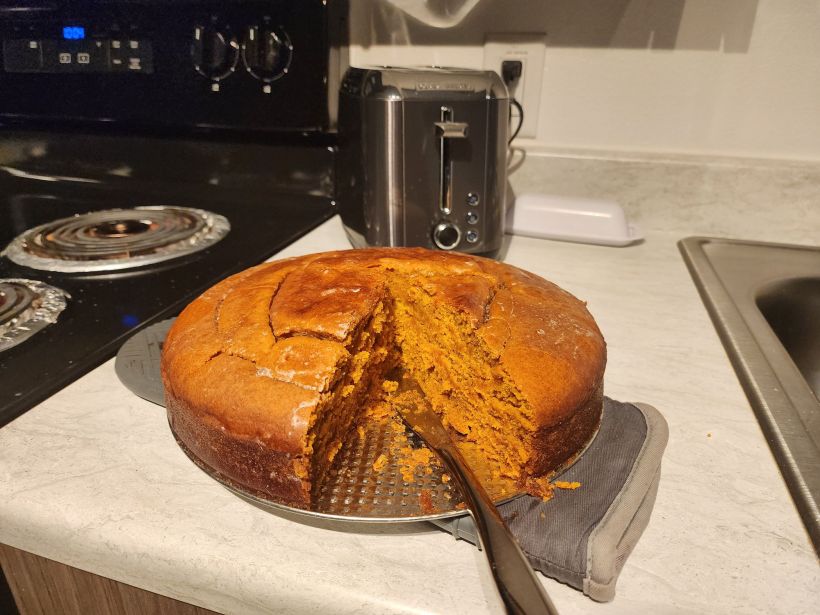
I realized early on that 350 for 45 – 50 minutes wasn’t going to get it done for this monstrosity, so I baked this apple crumble bomb at 380 for a whapping hour and 15 minutes… I know, right?! What was I thinking?
I think sometimes God loves to show favor on His children in some of the smallest, and most unexpected ways… that’s part of why I love God so!
Don’t ask me how, but I watched a miracle unfold, right before my oven eyes…
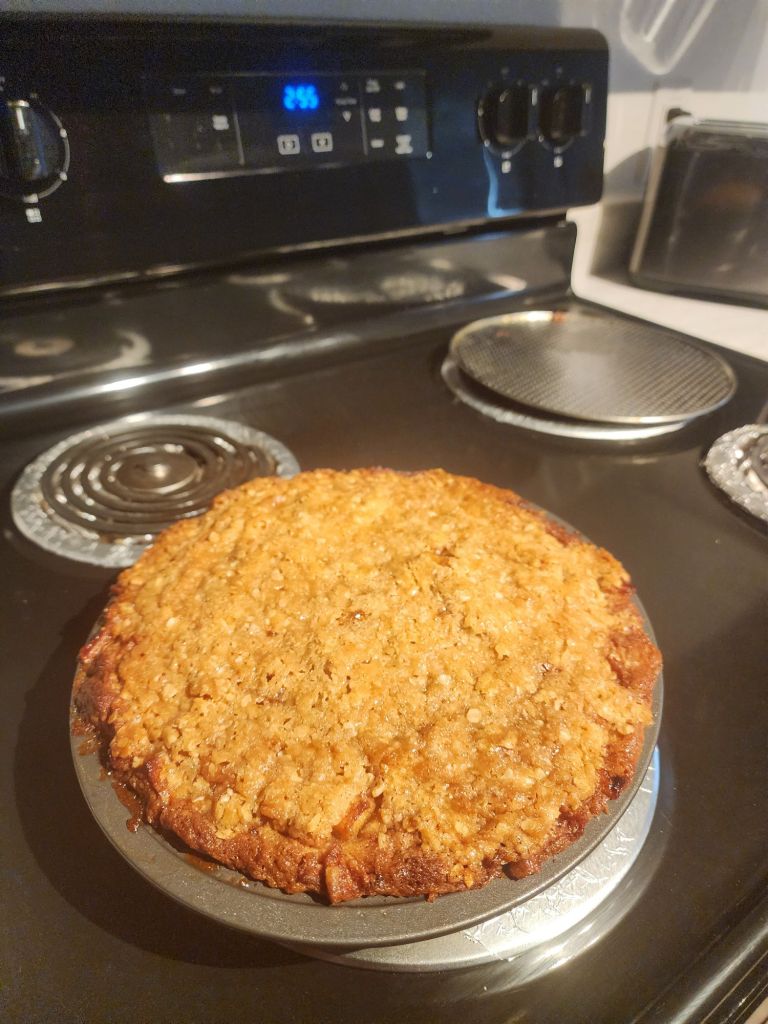
The only way that I can describe this would be to suggest one combine the most deliciously moist and flavorful apple cake/pie they’ve ever had, with the chewiest and gooiest apple oatmeal cookie known to mankind!
It was so heavy that I had to use two plastic plates from the Dollar Tree just to flip it over and out of the cake pan…
The apples didn’t sink to the bottom, nor was the cake stodgy or too bready, even after placing that pie filling on top, before baking.
I know the lighting is terrible, but I hope you get the idea… light and fluffy, with a caramelly crunchy topping.
I wouldn’t dream of taking credit for this amazing recipe, nor do I wish to forget the video from Facebook that gave me the idea for the compote, so please be sure to visit this site, as well. You never know, perhaps you’ll want to make them, too. https://www.facebook.com/reel/1226523166181722
I would have to say that this experiment in gluten-free baking was quite literally, The Bomb! Mee-maws Apple Bomb, that is…
As you must know by now, I’ve had to go ala natural with my foods. This means having to rethink every single thing I eat, from the ground up!
Baking sweet things has been my passion from the time I was a small girl, as I talk about my Easy-Bake Oven at every opportunity. Being the tenacious cookie monster that I am, there will be no white flag… no meek signs of retreat, no, no!
Seeing’s as it’s already heading into the holiday baking season, we’ve been afforded the opportunity to begin displaying our favorite sweet treats… even if it is Gluten, and mostly, Dairy Free (I can still bake with eggs, even if I can’t eat them on their own).
For now, I shall bring you a new recipe each Saturday that can replace an old one, thereby, allowing continued baking success for this Wiwookie Monster (I know, that was worse than a bad Dad Joke).
I know that I probably told you about my first successful Banana Muffins adventure, but it was a bit like cheating to be honest. I simply bought a box mix and added water, in a manner of speaking. The point is, it wasn’t homemade the way I’ve always done in the past.
I’m not about to be bested by something as silly as flour or milk, are you kidding me?! No way…
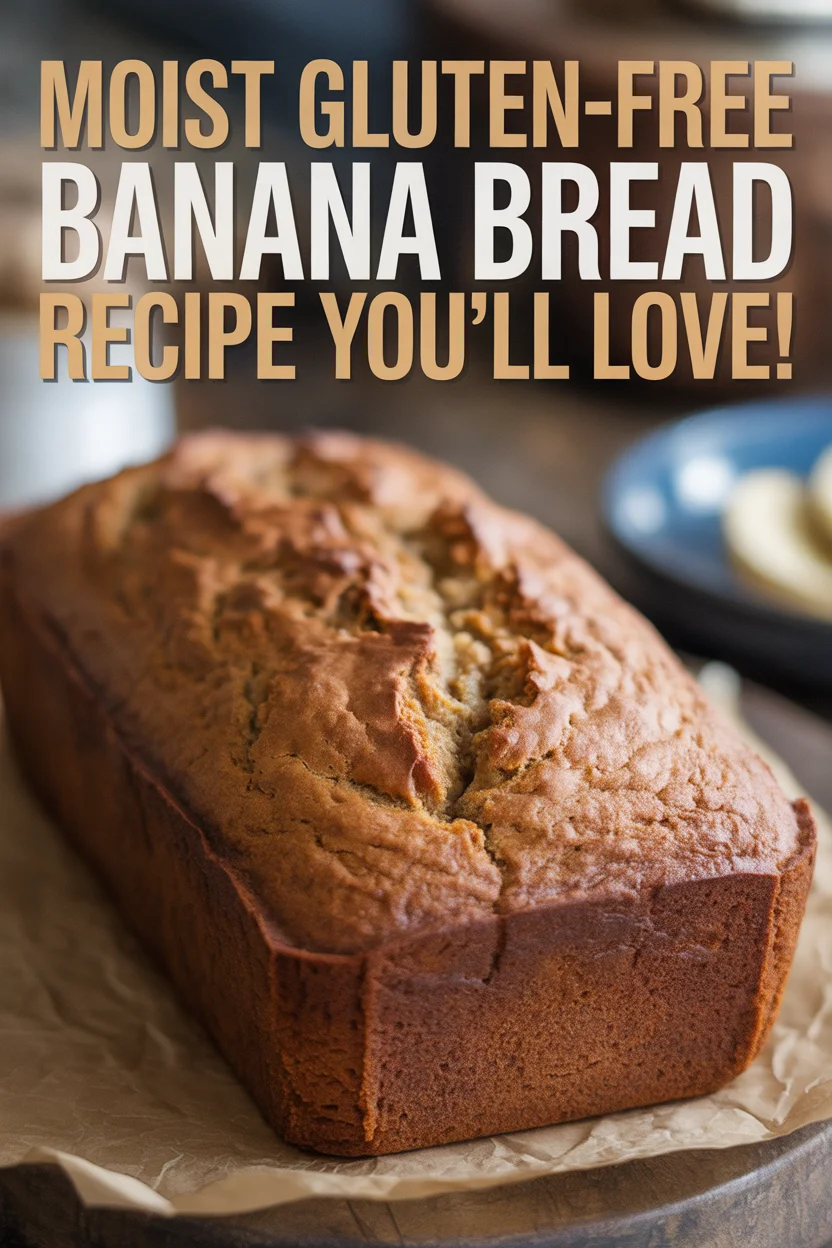
I found a recipe on Pinterest that I’ll share for anybody that’s interested, because it came out so good that you’d be hard-pressed to consider it Gluten Free.
A moist and flavorful gluten-free banana bread recipe that even picky eaters love.
Total Time: 75 minutes
Yield: 1 loaf
Ingredients
Scale
3 medium overripe bananas
2 large eggs
1/3 cup neutral oil (or melted butter)
1/2 cup packed brown sugar
1 teaspoon vanilla extract
1 3/4 cups gluten-free all-purpose flour blend
1 teaspoon baking soda
1/2 teaspoon salt
1/2 teaspoon cinnamon (optional)
1/2 cup chopped nuts or chocolate chips (optional)
Instructions
Mash the bananas in a large bowl using a fork.
Add eggs, oil, brown sugar, and vanilla extract; stir well.
Add gluten-free flour blend, baking soda, salt, and cinnamon; mix until almost no powder remains.
If using, fold in nuts or chocolate chips now.
Pour the mixture into a greased or parchment-lined loaf pan.
Bake at 350°F for 55 to 65 minutes, starting to check at 50 minutes, until a toothpick comes out clean.
Let the bread sit in the pan for 10 minutes, then cool on a rack before slicing.
I only had two overly ripe bananas and one that was fresh and new, so she suggests that you can add several tablespoons of raw honey to add more sweetness. Besides adding three tablespoons of raw honey to the mix, I opted out of the nuts and chocolate morsels, so as to get a true taste of the banana. I used everything else per the recipe, aside from adding a sprinkling of brown sugar across the top, for that crunchy crust that I especially love.
It rose just as much as a normal gluten bread…
And it was very sweet, moist, and had a bready texture as one would expect from a sweetbread…
I give 5 stars to this recipe, as I only had to add 1/2 cup of brown sugar and 3 Tbsps. of raw honey, in order to achieve a Banana Bread Lover’s melt in your mouth sweetbread!
Definitely, two thumbs up!
Tune in next Saturday for the next scrumptious scientific survey of sugary sweets, or possibly savories, or maybe even some soul foods. If you’ve suggestions for any specific scientific surveys you’d like me to try my Easy-Bake hands at, shout it out!
Have a blessed weekend, my sweet WordPress Family.
Remember that God loves you very much! And, so do I…
Once, there was time when a girl could eat whatever she wanted, with reckless abandon. She wasn’t tied down to just any old brand. And she never had to worry over what brands she chose to associate.
There was a time when she loved to celebrate with her closest associate, Mr. Folgers…
Alas, those days are gone.
There were the days of joyful indulgences with her most frequent of associates… you may know them. Folks used to call them the Tillamook Gang, but to me, they were my friends. I think I miss Cheddar the most, as she was most often in the kitchen…
Well, as I mentioned at the beginning of this, you are like those you associate with! Unfortunately, they weren’t the best influence, so I had to give them up.
Now, after learning to let go of that which is a bad influence, I cleaned up my kitchen and now have a new circle of brands to hang out with… the healthier kind!
At first, it wasn’t so easy. Meeting new brands that behaved far differently than my old brands was difficult for a time. Strange names and unusual characteristics made me feel very self-conscious and intimidated, not to mention a bit scared. Change is never easy, but for the sake of healthy associations with brands… it had to be done!
Now that I’ve taken the time to get more familiar with her, Chiquita has become a very loyal brand, faithfully supplying me with a better association with potassium, and the like…
Chiquita was so genuinely helpful and giving, she actually introduced me to the Foster Farm Girls…
You know, associating with them has done wonders for my health, seriously!
There is, however, one brand that has been my friend since my earliest days. My mother actually introduced me to them, first. I was only about five years old, when my mother bought me an Easy-Bake Oven. I’d never made cookies before. I’d only ever seen my mother do it, but she was now handing over the spatula, so to speak!
I was placed upon a stool that had been stacked with several Yellow Page telephone books. Before me sat my brand new oven, all the little trays, sprays, spoons, and such. But the world turned on it’s axis, when my mother handed me a large bowl filled with cookie dough! It wasn’t just any cookie do, however, but the original recipe from Nestle Toll House Morsels package… that was all it took!
From that little oven, came some of the best cookies I’ve ever tasted! Now, perhaps it was the sugar rush that kicked in, or even the bit of caffeine from the chocolate chips, hitting the bloodstream. The point is, I was hooked… not just on cookies, but on the Toll House brand!
I’ve had occasion to use other brands, but I always come back to Toll House! Whenever I see their packages, I’m immediately transported back to my childhood days… the good ones, though they be few. Thank you, Toll House!
I bet you guys are glad I kept this brand. I wouldn’t serve you anything less than wonderful… hugs
I know it’s shameful… I really shouldn’t… but… Ok! You twisted my arm, here. I feel a dream rising from the depths of my sweet, sweet, slumber…
… I knew it was a dream, only a dream…
But to indulge, just this once! Oh that I could melt into this dream, floating away down a smooth and silky chocolate river, toward oceans of sticky caramel…
Oh, wait a sec… back that up! The prompt is only asking about the bar, itself, so we’ll have to reschedule that dream for another time. Let’s try this again…
Ladies and Gentleman, today’s your lucky day! Every visitor is a winner! Now, I know you usually get a cookie for showing up to this game, but today is a special day and you have a once in a lifetime chance to pick a different prize!
**Disclaimer** You only get to pick one. No returns or exchanges once you touch it… duh! And, I shall not be held responsible for any Dentist or Orthodontist charges.
On with the show…
Now, if parties are your thing we’ve got just the right bar for you, my sweet friends…
We’ve got a glorious blend of white and dark chocolate, crafted by the finest artists from the distant isles of Partydom. It’s bar is designed for large gatherings. If the chairs get in people’s way, you can just eat them!
Door number two is for those who like it on the quieter, and more intimate side. This next bar should satisfy your chocolaty cravings…
Minus this strange man, of course!
There, that’s much better! Since the booth is made of the finest of caramels, it won’t melt when you sit on it.
Ahhh, door number three…
This is the perfect bar for the lounger, the slipper wearer, the midnight movie muncher! Its booth is of the finest marshmallows that only get fluffier when you sit on them.
Now, you’ve seen the three different Chocolate Bars to select as your prize, today. What shall you choose?
Will it be door number one, two, or three? Or, perhaps you’d simply like to stick with our usual cookies. I don’t know about everyone else but my teeth hurt from all that sweet chocolate bar stuff.
Sometimes it’s best to keep your dreams simple! Too much of a good thing tends to spoil the dream…
It seems like just yesterday she was playing dress-up…
and now she’s having a baby!
And guess what?
I know the gender of my grandbaby, but it’s a secret… for now. My daughter asked that I take a peek at her test results and not tell her the gender, yet. This way, I can bake the gender reveal cake for her and my son-in-law. They want to experience the surprise together, as a couple. Isn’t that incredibly romantic?
So, guess what today is?
Baking day!
I need to get the cakes baked and cooled, but I won’t be doing the frosting and decorating til tomorrow. I want the frosting to be as fresh as possible, so I’ll hold off doing it til just before we deliver it.
For now, I can show you the cake baking part as long as it’s only the cakes. I’ll be sure to show you the whole thing after the reveal, I promise!
I’m making a 4 layer white cake with the surprise candy hidden on the inside. The recipe I found is crazy! It calls to bake them for 50 minutes at 325. Even though my oven runs a bit warm, they baked for 43 minutes before I pulled them… absolutely perfect!
I’ve cooled, wrapped, and refrigerated them til tomorrow morning. When I get up in the morning, I’ll make a huge batch of Vanilla Buttercream frosting. My youngest daughter bought a very lovely cake topper, as well as the candy that goes on the inside.
For now, the scary part is finished… that is, perfect cakes for the decorating. I’m a flavor girl, so I don’t care how pretty the cake looks on the outside. If it doesn’t taste delicious then what’s the point, right?!
Oh, and I even cleaned up my mess! Well, to be honest, it wasn’t that difficult. Ever since I began my baking adventures with that tiny Easy-Bake-Oven, my workspace needed to be clean. I suppose that every baker worth their salt, or more appropriately, their sugar, keeps things clean as they go along. It helps keep a clean and organized work space! Willy Wonka’s factory was always clean and organized… it had to be!
That way he could focus on the magic in the candy. Well, at least that’s what I think…
My nana always had candy, bowls of it, in fact! She always made sure they were freshly filled for our little visiting fingers, whenever we stayed at her home.
They weren’t always the some, though, because she liked variety… and she knew that we would too. Some days she’d have a mix of peppermint, butterscotch, and cinnamon flavored hard candies. My personal favorite were the butterscotch!
On special occasions, there would be bowls all over her home, in sets of three; one bowl with nuts, one with candies, and one with mixed chocolates. I always cleaned out the little candies, specifically the yellow butter mints. You know, for some funny reason, when I ran across them in a store and bought them, the flavor wasn’t the same… how sad, right?!
Honestly, I think it’s the memory of my nana’s house that I fondly recall, more than the candy. Perhaps it’s better to keep the flavor fantasy, just that… a fantasy, a sweet dream of more innocent times.
I still really do love butter mints, and yellow is still my favorite color, and I doubt that will ever change…